
In this tutorial we will use the command-line tools at our disposal to accomplish a relatively advanced task: taking a video containing audible speech (and possibly non-speech audio), and adding an automatically recognised subtitle track to the video file. We will be using
ffmpeg, a versatile program for processing video, audio and multimedia dataopenSMILE, intended for signal processing of audio data, used especially for analysing features of speech and musicffmpegIf you’re working on CSC’s computing environment, or other systems with a similar module management system, ffmpeg might be available as a module:
$ module load ffmpeg
Otherwise, you can follow the installation instructions available here.
ffmpegHere, we want to create an audio file with the video’s sound. For speech, we aren’t interested in multi-channel audio, so we can just aim for a monaural audio track.
Audio processing software generally uses uncompressed audio. Most video files contain compressed audio instead. If you happen to have access to the uncompressed audio track instead, you should of course use it, but otherwise, ffmpeg will dump the primary audio track of your video file with this command:
ffmpeg -i input_video_file -vn -ac 1 -acodec pcm_s16le output_audio.wav
-i names the input file we want to give ffmpeg-vn tells ffmpeg “no video”-ac 1 tells ffmpeg “one audio channel”. If the original audio is multi-channel, it will be properly downmixed to one channel. NB: If you have multiple audio tracks with different content, you can specify which one to use with -map 0:a:n, which will map the nth audio channel to 0, which is the one we will write to the output file.-acodec pcm_s16le tells ffmpeg which audio format to use. In this case, it’s PCM audio with signed 16-bit little-endian samples. The details aren’t so important, we’re just trying to make sure it’s going to be a compatible .wav file.output_audio.wav is the output file nameAs a result, we get one large audio file, possibly too long to comfortably process in one run of a speech recognition program. In the next step, we will pare it down to only those parts that contain speech, and segment it into turns, meaning parts where the speaker changes or the speaker pauses.
config/ and scripts/The command-line tool we’ll be using in this guide is SMILExtract. If you’re working on CSC’s computing environment, or other systems with a similar module management system, openSMILE might be available as a module:
$ module load openSMILE
Otherwise, you can follow the openSMILE installation instructions available here.
OpenSMILE distributions ship with a config/ directory, containing configurations to extract features that are intended to be useful in upstream tasks, like speaker emotion detection, and a scripts/ directory, which have something closer to a complete pipeline for a particular task. On CSC’s computing environment, these can be found in environment variables $OPENSMILE_CONFIG and $OPENSMILE_SCRIPTS. In this case, we are going to use the code in $OPENSMILE_SCRIPTS/vad/ (VAD stands for voice activity detection). From the README:
This is meant as an example to show how to implement such
a VAD in openSMILE with the RNN components and to provide
a simple VAD for prototype development. The noise-robustness
of this VAD is *not* state-of-the-art, it has been built on
a small-scale research data-set, mainly for clean speech.
...
If you need a more accurate and noise-robust VAD,
contact audEERING at info@audeering.com for a demo of
our latest commercial VAD technology.
So what we hope to accomplish here is something useful for cases where the audio is not too noisy, and then if we wanted to upgrade to a commercial offering, we could hopefully use the same pipeline.
scripts/vad has two scripts, vad_opensource.conf, which outputs a numerical value for each audio frame representing its level of voice activity, and vad_segmenter.conf, which writes actual .wav files corresponding to parts of the original audio that contain voice.
The scripts in vad/ have dependencies on other files in the same directory, so to successfully run them, your working directory has to be vad/. If you don’t already have your own copy of the VAD script directory available on CSC’s computing environment, you can create one and cd to the appropriate directory:
$ cp -r $OPENSMILE_SCRIPTS/vad .
$ cd vad
(The $ stands for the command prompt, meaning that this is two separate commands.)
vad_segmenter can write only the segmented audio if that’s what you want, but it can also provide a list of timestamps and the raw voice activation information as well. We can produce them all with a commmand like this:
$ SMILExtract -C vad_segmenter.conf -I /path/to/audio.wav \
-waveoutput /path/to/speech_segment -csvoutput /path/to/vad_data.csv \
-saveSegmentTimes /path/to/segments.csv
Notes:
/path/to/ in the -I option should be replaced with the directory where your audio is.-waveoutput is a prefix, so in this case the segments will have names like speech_segment_0001.wav under the given path.vad_data.csv will have entries like
0.000000;-5.076322e-01
0.010000;-6.303211e-01
and so on, with the first column being audio frame timestamps and the second column being the activation. You can plot this data with eg. gnuplot (or a spreadsheet, if you prefer):
$ gnuplot
gnuplot> set datafile separator ';'
gnuplot> set xlabel 'Time (s)'
gnuplot> plot 'vad_data.csv' using 1:2 with lines title 'Voice activity'
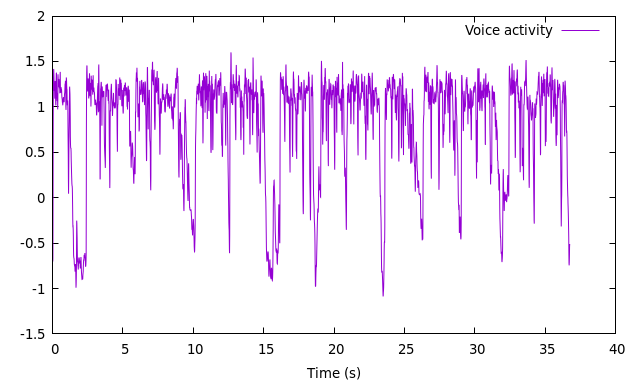
(This is a short audio file with just speech and short pauses.)
segments.csv will have names of segment files, start & end times, and audio frame counts:
output_segment_0001.wav;1.000000,1.430000;70
output_segment_0002.wav;2.400000,9.740000;761
output_segment_0003.wav;10.150000,15.170000;529
output_segment_0004.wav;15.700000,36.680000;2107
Probably because of the way it’s initialised, openSMILE’s free voice activity detection module has a tendency to ignore speech happening right at the beginning of the audio file. This unfortunate problem can be circumvented either by
output_segment_0001.wav. In segments.csv, find the time at which the original first segment ends (say, 2.430000), and use ffmpeg to extract audio from the beginning to that point with ffmpeg -i output_audio.wav -t 2.43 -acodec copy output_segment_0001.wav.ffmpeg -f lavfi -t 1 -i anullsrc=channel_layout=mono:sample_rate=44100 -i output_audio.wav -filter_complex "[0:a][1:a]concat=n=2:v=0:a=1" output_audio_with_silence.wavlavfi is ffmpeg’s virtual input device, anullsrc is a null source, and these are combined with the original usin filter_complex’s concat feature.For this part of the tutorial, we will use, as an example, Kielipankki’s Finnish ASR endpoint. That endpoint may not always be available free of cost, but other options, including ones you can run locally (like Whisper) will be similar.
Referring to the API documentation, you may script the ASR process in the programming language of your choice. For example, once we have read the segment names and times, this Python snippet:
base_url = "https://kielipankki.rahtiapp.fi/audio/asr/fi"
submit_url = base_url + "/submit_file"
query_url = base_url + "/query_job"
response = requests.post(
            submit_url,
            files={"file": (audio_segment_filename, open(path_to_audio_segment, "rb"))},
        )
response_dict = json.loads(response.text)
while True:
    time.sleep(1)
    query_response = requests.post(query_url, data=response_dict["jobid"])
    query_response_dict = json.loads(query_response.text)
    is_pending = (
        "status" in query_response_dict
        and query_response_dict["status"] == "pending"
    )
    incomplete = (
        "done" in query_response_dict and query_response_dict["done"] == False
    )
    if is_pending or incomplete:
        continue
    else:
        break
for segment in query_response_dict["segments"]:
    # these are segments from the ASR endpoint, not our segments
    duration = float(segment["duration"])
    transcript = segment["responses"][0]["transcript"]
Shows the process of sending an audio file to the ASR endpoint, and getting back a list of segments with durations and transcripts.
The most widespread subtitle file format is .srt, which consists of a numbered sequence of subtitle frames like this:
1
00:00:01,000 --> 00:00:05,500
This is the first subtitle frame, appearing at one second.

2
00:01:23,000 --> 00:01:33,300
This is the second subtitle frame. There's a lot of silence before it.
The timestamps, in the form of hours:minutes:seconds,milliseconds, determine when and for how long the subtitle should be displayed.
.srt writer scriptYou can see an example srt writer here. Usage is like this (output goes to stdout, from whence it may be redirected to a file):
$ python write_srt_from_audio_segments.py --segment-file segments.csv
1
00:00:02,400 --> 00:00:09,996
pohjantuuli ja aurinko väittelivät kummalla olisi enemmän voimaa kun he samalla näkivät kulkijan jolla oli yllään lämmin takki

2
00:00:10,150 --> 00:00:15,430
silloin he sopivat että se on voimakkaampi joka nopeammin saa kulkijan riisumaan takkinsa

3
00:00:15,700 --> 00:00:23,407
pohjantuuli alkoi puhaltaa niin että viuhuu mutta mitä kovemmin se puhalsi sitä tiukemmin kääri mies takin ympärilleen
Depending on the video container format you wish to have as an output, there are a few different options for embedding subtitle streams. And in almost all cases, it’s possible to “burn in” the subtitles directly into the video itself, if desired.
These files, typically with the extension .mkv, natively support the .srt format, so embedding them is easy. In the case of one video and one subtitle track, this command:
$ ffmpeg -i input_video.mkv -i subtitles.srt -c:v copy -c:a copy \
-c:s srt output_video.mkv
will produce an output file with the subtitles from subtitles.srt
If we had multiple languages, ffmpeg can write the streams and metadata likewise with a single command:
ffmpeg -i input_video.mkv -i english_subtitles.srt -i spanish_subtitles.srt \
-i french_subtitles.srt -map 0 -map 1 -map 2 -map 3 -c:v copy -c:a copy \
-c:s srt -metadata:s:s:0 language=eng -metadata:s:s:1 language=spa \
-metadata:s:s:2 language=fre output_video.mkv
writes English, Spanish and French subtitle tracks.
.mp4For mp4 video files, ffmpeg is able to write mov_text subtitle tracks (of which there, again, may be multiple). To write a single track, the command
$ ffmpeg -i input_video.mp4 -i subtitles.srt -c:v copy -c:a copy -c:s mov_text \
-metadata:s:s:0 language=fin output_video.mp4
writes a Finnish-language subtitle track.
It’s practically always preferable to use subtitle streams in container files as above, as they keep the original video unchanged, allow for multilingual subtitling and turning the subtitles on and off. However, in some exceptional cases it might be preferable to superimpose subtitles directly onto the video image.
ffmpeg has a filter called subtitles which is able to do this from .srt files:
$ ffmpeg -i input_video.mp4 -vf "subtitles=subtitles.srt" -c:a copy output_video.mp4